xccache
🚀 Getting Started
Table of Contents
Quick Start
✍🏼 Case Study: Using XCCache in Kickstarter iOS Project ← Read here.
Simply run xccache under the root directory of the project. Then, you should see:
xccache.lock: containing the info about packages in the project alongside the products being used. You’re recommended to track this file in git.- The
xccachedirectory: containing build intermediates for the integration. This directory is similar to thePodsdirectory (in CocoaPods). Do NOT remove this directory. Instead, please ignore it from git.
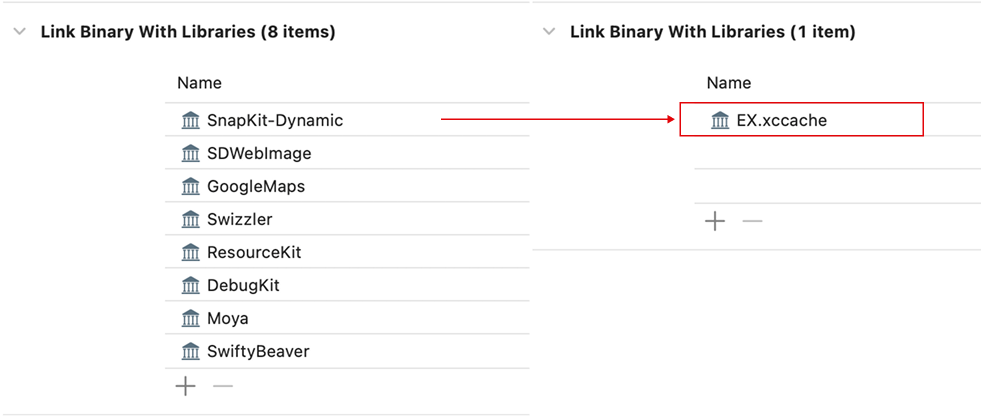
If you see product dependencies of a Swift package being removed from the Link Binary With Libraries section, it is expected.
In return, this plugin adds another <Target>.xccache product which includes your product dependencies.
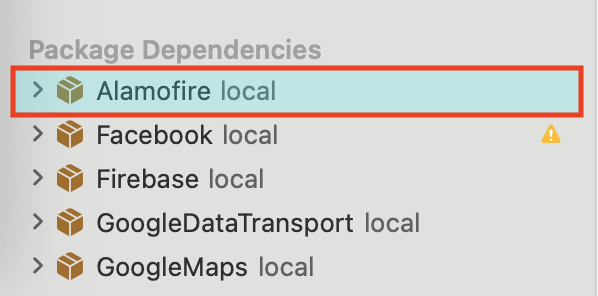
Also, you may notice that all packages turn into local packages. This is perfectly normal as the tool creates special packages called proxy packages to manipulate cache of a package.
Understanding the Tool
Read the overview: here.
Following are some docs about what happens under the hood:
- Packaging as an xcframework
- Ensuring
Bundle.moduleWhen Accessing Resources - Macro as Binary
- Proxy Packages
Working With Cache
[!TIP] Use the
--helpoption in the CLI to explore available (sub)commands and their supported options/flags.
Building Cache
To build cache of Swift packages, run xccache build.
By default, the tool only builds cache-missed targets. To build specify targets, specify them in the arguments, for example:
xccache build SwiftyBeaver SDWebImage
The prebuilt xcframeworks are available under xccache/binaries, following the structure as below:
xccache /-- binaries /-- SwiftyBeaver /-- SwiftyBeaver-<checksum>.xcframework
                                      |-- SwiftyBeaver.xcframework
To build dependencies if cache-missed, use the --recursive option. For example, to build cache of FirebaseCrashlytics (including its dependencies):
xccache build FirebaseCrashlytics --recursive
Using Cache
Run xccache use or simply xccache to integrate cache to the project. Note that cache, after being built with xccache build, is automatically integrated to the project. You don’t need to run xccache use in this case.
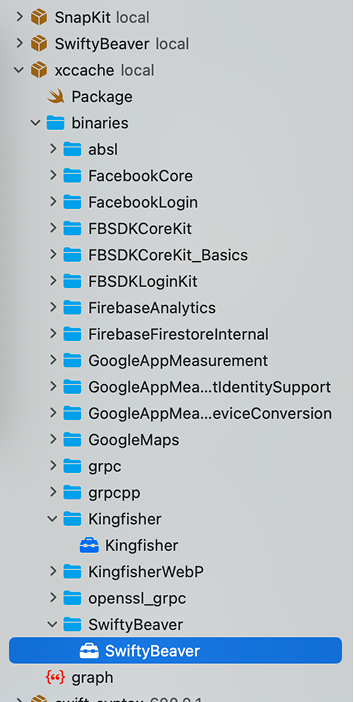
In the Package Dependencies section in Xcode, you should notice a special package call xccache.
The binaries directory of this package reflects the cache being used. For example, in the following image, SwiftyBeaver is integrated as binary.
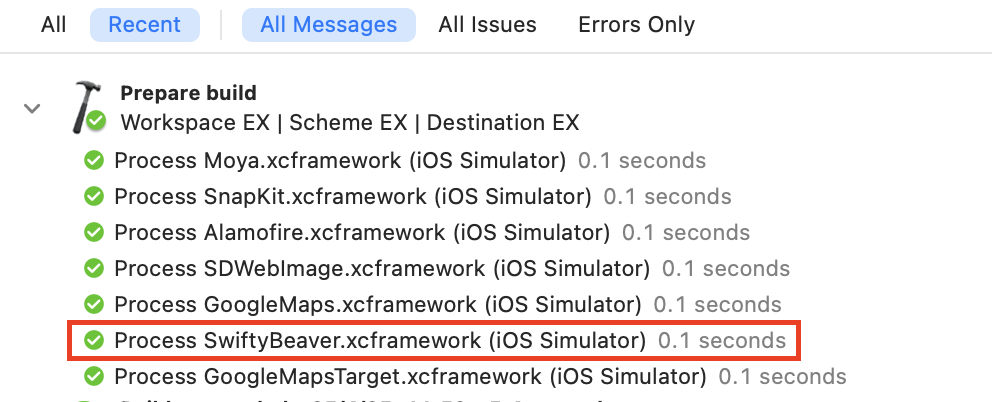
In Xcode build log, you should see xcframeworks of the cache-hit targets being processed by Xcode.
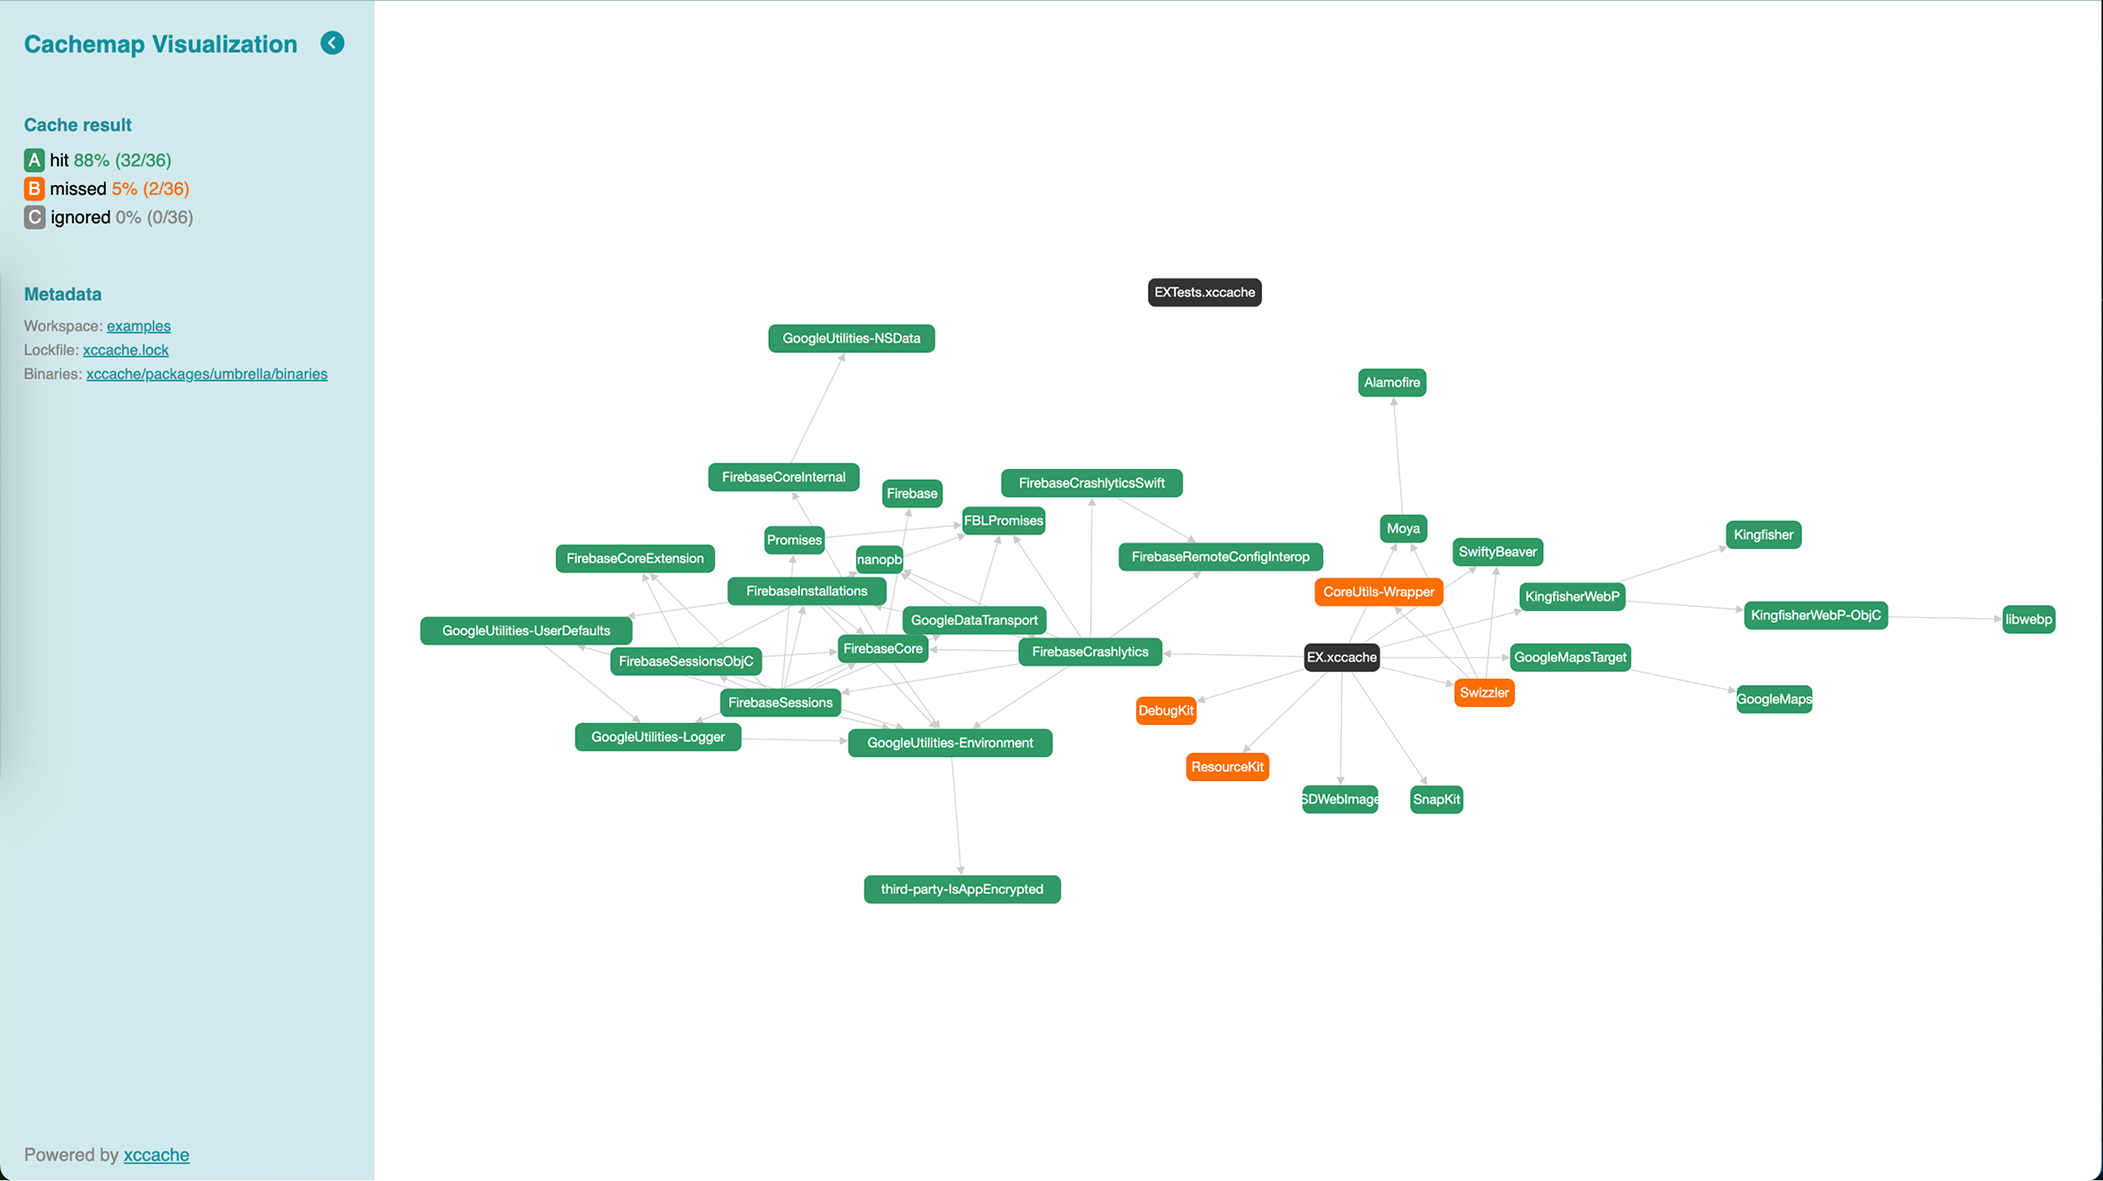
Viewing Cachemap Visualization
Whenever cache is integrated into your project (via xccache, xccache use, or xccache build), the tool generates an html (at xccache/cachemap.html) that visualizes the cache dependencies.
Example: 👉 ex-viz/cachemap.
Open this html in your browser to better understand the depenencies in your project.
Switching Between Binary and Source Code
By default, the tool attemtps to use cache if exists. In case you want to force-switch to source mode for specific targets, there are a few approaches you may consider:
(1) Run xccache off <targets> (ex. xccache off DebugKit ResourceKit).
Note that the preferences set by this command is not persistent. This means, the next time you run xccache, those targets will not be remembered; cache will be integrated if exists.
(2) If you’re looking for a persistent preferences, consider adding them to the ignore list in the configuration file.
(3) Or, you can simply just delete the cache, ex. rm -rf ~/.xccache/debug/DebugKit.
[!IMPORTANT] After running any xccache command, remember to trigger resolving package versions again (File -> Packages -> Resolve Package Versions). Xcode doesn’t automatically reload packages upon changes.
Rolling Back Cache
Run xccache rollback. This returns the project to the original state where product dependencies are specified in the Link Binary With Libraries section and <Target>.xccache is removed from this section.
[!WARNING] Well, you’re advised not to use this action if not necessary.
If you want to use source code entirely, consider purging the cache (xccache cache clean --all) instead.
Multiplatform Cache
An xcframework can include slices for multiple platforms. Use the --sdk option to specify the sdk (iphonesimulator, iphoneos, etc.) to use. If not specified, it uses the default_sdk configuration in the config if exist. Otherwise, it defaults to iphonesimulator.
When building cache, the tool merges existing slices with the newly created to reduce unnecessary builds for multiplatform support. This behavior is controlled by the --merge-slices flag (default: true). To disable it, ie. replacing the existing xcframework if exists, specify --no-merge-slices.
xccache build SwiftyBeaver --sdk=iphonesimulator
xccache build SwiftyBeaver --sdk=iphoneos # <-- here, xcframework contains both sdks: iphonesimulator and iphoneos

xccache build SwiftyBeaver --sdk=macos --no-merge-slices # <-- here, xcframework contains only macos sdk
Per-Configuration Cache
Cache of different build configurations (debug/release) is hosted in separate directories ~/.xccache/<configuration>. The build configuration is defaulted to debug. To specify a different build configuration, use the --config argument.
xccache build SwiftyBeaver --config=release
xccache --config=release
Sharing Remote Cache
Cache can be shared among team with remote cache, using Git or S3.
xccache remote pull # <-- pull cache
xccache remote push # <-- push cache
Refer to the remote configuration for the setup.
Working With Swift Packages
Building a Swift Package Target
Packaging a Swift package target as binary is not as easy as it seems, which involves several steps. This tool offers a convenient way to build such a target into an xcframework with just only one step. Check out build options (ex. configuration, sdk, etc.) with --help.
xccache pkg build <Target>
Managing Dependencies
Adding a Dependency
To add a new package, or new product dependencies (in the Link Binary With Libraries section), you can just add it the way you usually do (via Xcode), then just run xccache again.
After that, you should see the changes reflected in xccache.lock.
Alternatively, you can directly modify the lockfile with the changes above, and run xccache. This way, you can avoid modifying the xcodeproj file.
Removing a Dependency
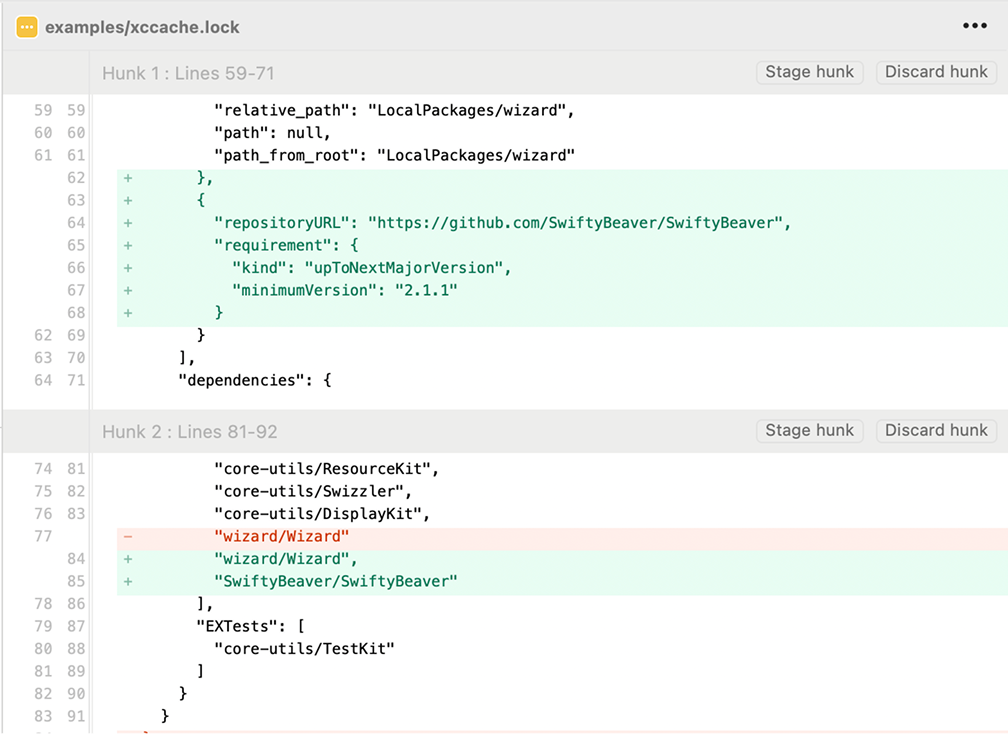
Just directly update the lockfile:
- Remove it from the dependencies section
- Remove it from the packages section if not in use
  "dependencies": {
    "EX": [
      "Moya/Moya",
      "SwiftyBeaver/SwiftyBeaver", // <-- Remove this if not in use
    ]
  },
  "packages": [
    { // <-- Remove this if not in use
      "repositoryURL": "https://github.com/SwiftyBeaver/SwiftyBeaver",
      "requirement": {
        "kind": "upToNextMajorVersion",
        "minimumVersion": "2.1.1"
      }
    }
  ]
Configuration
Check out this doc: Configuration